

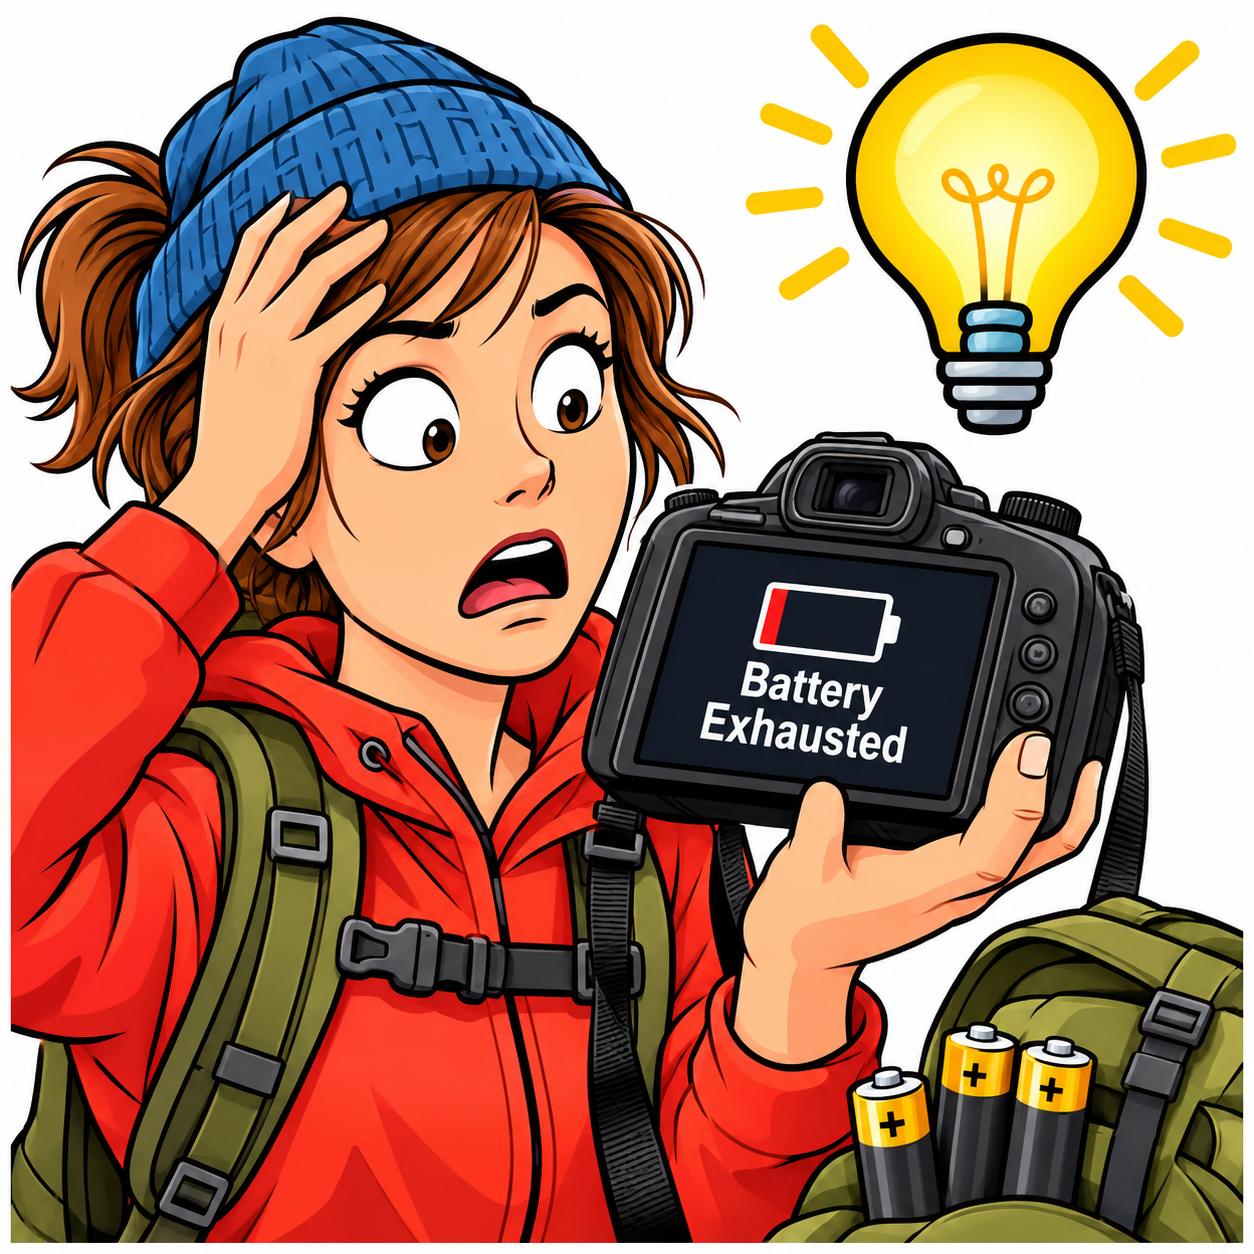
You have been sitting in the frost since before first light, and a fox finally trots out along the edge of the meadow. You lift the camera, and the screen flashes “battery exhausted”, even though it showed two bars when you checked it at the tent.
That battery is probably still close to full. Once you know what happened inside it, you can have it working again in about the time it takes the fox to cross the field, and you can stretch the same handful of batteries across a whole week with no power.
I have lost shots this way, and the fix turned out to be a routine I could carry in my head. It starts with understanding why the camera gave up.
When you’re packing camera batteries for backpacking, three things matter most: how you keep spares warm, which camera settings drain power, and how many batteries you’ll need between charges.
Why your camera battery died on a backpacking trip with charge still inside
A lithium-ion battery makes power by moving lithium ions from one side of the cell to the other. Cold slows that movement down, which means the battery can only release its energy in a trickle.
The polar explorer Eric Larsen and the American Alpine Institute sum it up like this:
“Batteries do not lose their power in cold weather; they are just not able to give quite as much of it up.”
A 2022 review of lithium-ion batteries in cold conditions in the journal Materials by Luo and colleagues explains the detail (1). Below 0 °C, ions spread more slowly through the electrodes and the liquid electrolyte between them, so resistance inside the cell climbs and the voltage it delivers drops.
In some common cell designs, the review notes, the battery keeps “only a small portion of their capacity” while it stays that cold, and some stop working altogether.
Your camera watches voltage closely, because its electronics need a minimum level to run. When a cold battery sags under that line, the camera reads it as empty and shuts down, even though most of the energy is still sitting in the cell.
Warm the battery and the ions speed up again, so the voltage climbs back and the bars return.
So a “dead” battery on the trail is usually just a cold one, and that idea is the whole basis of the system that follows.
How to keep a camera battery warm on a winter hike
Bryan Hansel has taught winter photography in northern Minnesota for close to twenty years, and his method is simple enough to copy on your next trip. He carries his spares inside his coat, against his body, and when the battery in the camera gets cold he swaps it for a warm one.
What makes this a system is what you do with the cold battery afterwards. It goes back into the warm pocket, where it recovers, and later it comes back out to take its turn again.
It pays to swap earlier than feels natural, at around 20 to 30 percent on the camera’s gauge, because a cell that is both cold and low will crash to zero faster than the gauge suggests.
Give the swapped battery 10 to 15 minutes in an inner pocket and it will usually show usable charge again.
With two or three batteries cycling like this, you get far more shooting time than if you ran each one flat in turn, since you are pulling out energy the cold would otherwise have left stranded.
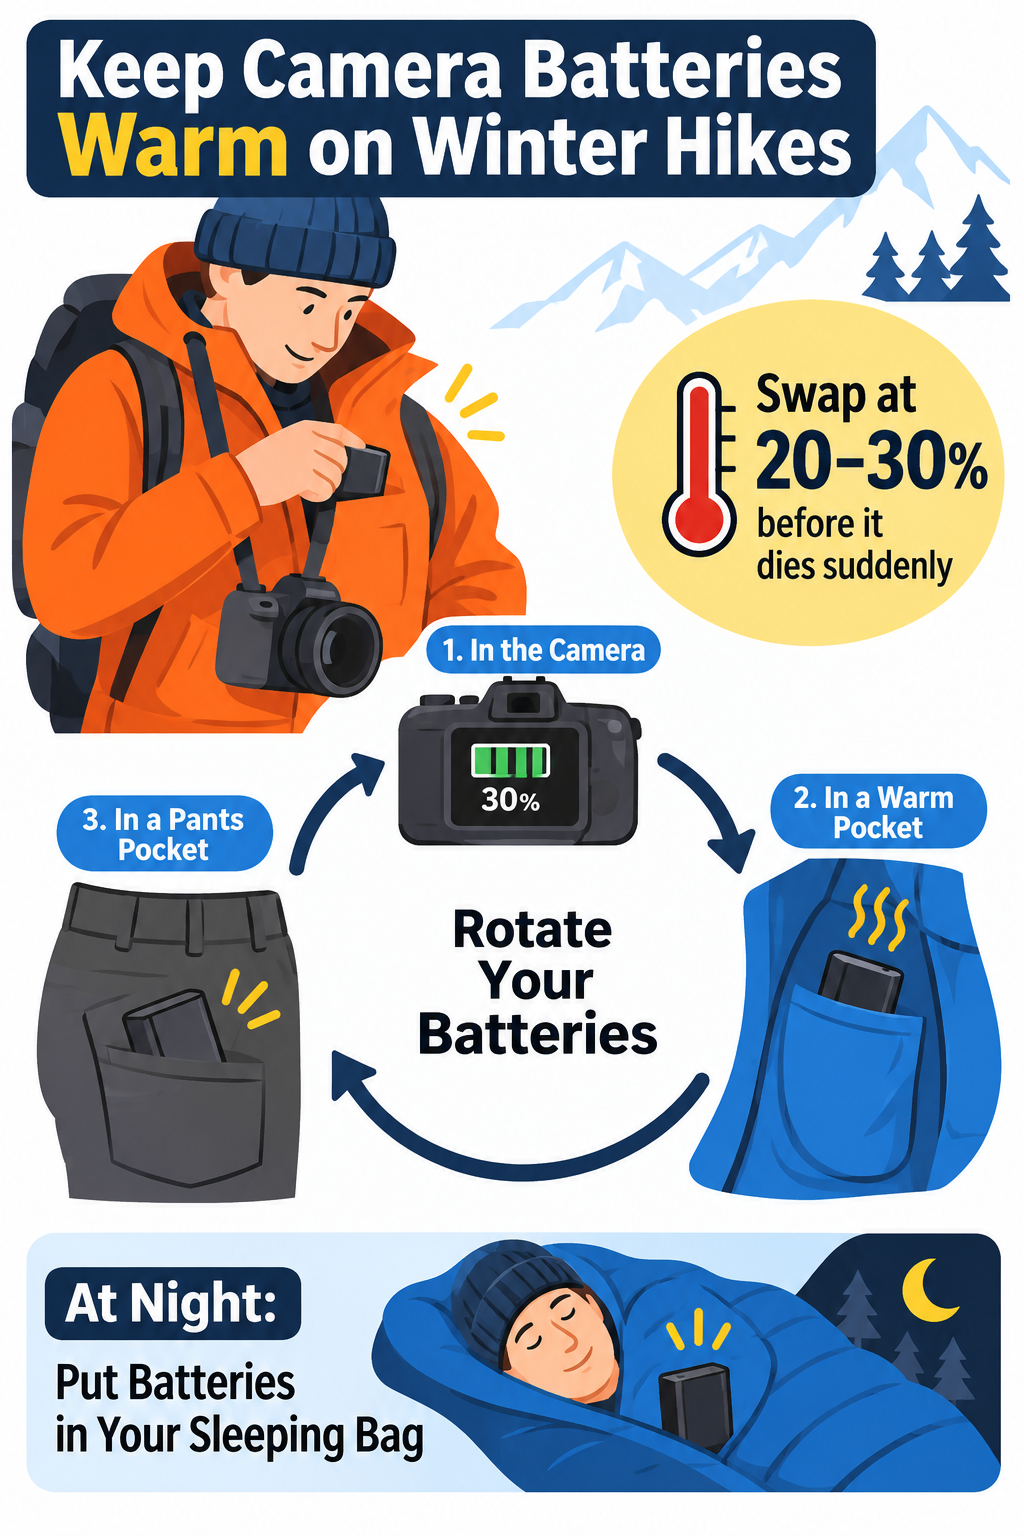
Here is the rotation as I run it:
- One battery in the camera, one in a chest pocket under your jacket, and one in a trouser pocket or another inner layer.
- At about 30 percent, swap the camera battery for the warmest spare.
- Put the cold one in the pocket closest to your skin.
- When the next one drops, rotate again, always reaching for the battery that has been warm the longest.
At night the batteries go into your sleeping bag with you. A sleeping bag holds body heat for hours, so you wake up with batteries ready to work, and you skip the job of warming frozen ones with cold hands at dawn.
You will find backpackers who disagree about this. On the Backpacking Light forums, some say leaving lithium cells at 15 °F overnight does no harm as long as you warm them before use.
Another poster repeats a claim, with no source behind it, that a one-hour soak at 5 °F leaves 95 percent of capacity while a full night leaves only about half.
I would not bet a dawn shoot on either side. Sleeping with the spares you need tomorrow costs you nothing, and it removes the gamble right at the hour when the light and the animals are at their best.
Warmth fixes almost everything here, which is why it is tempting to reach for faster sources of heat in camp, and that is exactly where batteries get damaged.
Warming and charging mistakes to avoid in camp
A campfire or a stove looks like a quick way to bring a battery back. Hansel and the team at SLR Lounge both warn against it, because rapid heat can swell or damage the cell, and a swollen battery may not even fit back into the camera.
Slow body heat works at the right speed, so if a battery feels cold to the touch, it goes inside your clothing and you wait.
The bigger risk comes from the power bank. Charging a frozen lithium battery pushes ions into the anode faster than it can take them in, so metallic lithium plates onto the surface and can grow into thin spikes called dendrites, which the Luo review links to short circuits and thermal runaway (1).
That is a fire risk inside your tent, and it also wears the battery out.
Let the battery reach the charging temperature specified by your camera manufacturer. For example, Sony’s camera battery charging guidance recommends an ambient temperature of 50–86°F (10–30°C). Charge it on a hard, flat surface away from sleeping bags and other bedding.
Even storage in deep cold carries a small cost. Researchers at SLAC, Stanford’s national laboratory, reported early studies where battery cathodes kept below zero lost up to 5 percent more capacity, and extreme cold cracked the cathode material.
Those were lab conditions, so treat the number as a rough warning.
Most of the cold effect still wears off once you warm the battery, but freezing and thawing your spares every day adds up, which is one more reason to keep them in your clothes.
Cold is only half of the drain, though, and the other half comes from the camera itself.
Find the hidden drains in your camera settings
In his guide to powering a camera on multi-day hikes, Luke Tscharke describes trekking for a week at a time in Tasmania with a Sony A7R II and finding a drain that had nothing to do with temperature.
The eye sensor beside the viewfinder can be triggered by the inside of a pack, so the camera keeps waking up and can empty a battery in a few hours while it rides on your back. Sleep mode did not save him, so now he switches the camera fully off before it goes into the pack.
The rear screen is the biggest drain for most cameras. Bob Gross, a long-time poster on Backpacking Light, points out that a camera with the back screen lit most of the time uses a lot of power, while one with an optical viewfinder uses very little except for about two seconds after each shot.
On a mirrorless body, that means shooting through the viewfinder with the rear screen set to stay dark.
Turn off automatic image review as well, because checking every frame on the back of the camera feels harmless and quietly costs you a lot across a long day.
Before the trip, I change these settings and leave them that way:
- Airplane mode on, which Tscharke says extends battery life “rather dramatically” by shutting down Wi-Fi and Bluetooth.
- GPS off, along with any location link to your phone.
- Image stabilisation off whenever you are on a tripod or using a fast shutter speed.
- EVF refresh rate set to standard, with screen brightness turned down.
- Eye sensor off, or the camera fully off, before it goes in the pack.
Stabilisation matters a lot for wildlife shooters, because a long lens with IS running and a fast-refreshing viewfinder can stay powered for hours while you wait for an animal to show up.
Tscharke also limits long exposures and time-lapses on these trips, since heavy processing and constant writing to the card eat charge.
Sources split on whether to leave the camera in standby or turn it off between shots. GoPro advises standby in extreme cold, and a Fred Miranda forum user explains why: a camera that sits switched off cools down, and a colder battery loses its usable charge faster.
Tscharke says to switch off because of that eye sensor. Both make sense, and the answer depends on the gap between shots.
If you expect action within a few minutes and the camera hangs inside your jacket, leave it on so it stays warm. If it is going into the pack for an hour of walking, switch it off and move the battery to your pocket.
Once the drains are under control, you can work out how many batteries to pack, and the answer comes down to a simple daily budget.
How many batteries for how many days
Tscharke budgets one battery per day for his Sony, which on a seven-day trek means about seven batteries at roughly 45 grams each. That is a little over 300 grams, which weighs less than a full water bottle. If you’re making room for extra batteries, see our guide to lightweight hiking photography gear for ways to trim weight elsewhere in your kit.
For a DSLR with an optical viewfinder, he estimates one battery for every two days, because the mirror and the dark rear screen use so little power between shots.
His numbers come from temperate Tasmanian trips. In freezing conditions I add one or two batteries on top, since each cold swap leaves some charge you cannot reach until the battery warms, and the rotation needs at least one battery warming while another works.
For planning, take your camera’s normal daily use and multiply it by the number of days.
Then add one battery for the rotation, plus one more for each very cold day you expect, and test that total on a long day hike at home before you trust it.
Filling that budget with cheap spares saves money, and whether they hold up depends heavily on the brand and the age of each battery.
Third party camera battery problems and how to test for them
Bob Gross has bought a lot of aftermarket Canon batteries over the years, and his summary is blunt. Cheap ones “look good for about a year, and then they go to hell rapidly.”
When they fade, they take longer to charge and stop filling up as far. They also lose charge faster while they sit unused, sometimes within six months of purchase.
That slow self-discharge is the failure that hurts on a hike, because you pack a spare that read full at home, carry it for four days, and find half of it gone the moment you need it.
Photography Life lists the other known problems with third-party batteries, which are leaking, swelling, a shorter useful life than the camera maker’s own, and trouble working with the camera or its original charger.
One OM System user found that Watson batteries swelled until they were very hard to pull out of the camera. A swollen battery stuck in the grip on day three ends your rotation, since you cannot swap a battery you cannot remove.
The picture is mixed, though, and the brand matters more than the label. One Backpacking Light user found a Wasabi battery performed the same as the Panasonic original, and another had an aftermarket Olympus battery rated at 1500 mAh against 1000 mAh for the original.
A third user’s aftermarket Nikon D300 battery faded after a year and then would not power the camera at all. Some bodies, such as the Panasonic GH2, refuse non-original batteries outright.
My approach is to use the camera maker’s batteries as the main ones and tested aftermarket batteries as rotation spares.
Gross buys the best aftermarket brands from the big camera retailers, and he runs every new battery through a couple of full charge and discharge cycles and compares it with the others before he trusts it on a trip.
To do the same, charge every battery fully, then run each one down in the camera and note how long it lasted, so the weak cells show up as the short runners.
Next, leave them all charged in a drawer for two weeks and check the levels again, because poor self-discharge shows itself in that drop. Finally, test-fit each battery in the camera and look for any bulge before it goes in your pack.
With tested batteries and good habits, body heat handles most trips, although a few situations need more help than your own warmth can give.
Batteries dying in cold weather hiking, from wildlife blinds to headlamps
Sitting still in a blind for three hours at minus 15 °C is a harder problem than hiking, because your body makes much less heat when you are not moving and the batteries in your pockets cool down with you.
One hiker on the r/hiking forum keeps batteries in a small Pelican case lined with foam and aluminium foil, with a chemical hand warmer inside that gets replaced once a day. The case traps the warmer’s heat around the cells for hours.
The photographer David Bergman, quoted by SLR Lounge, puts a mini hand warmer right on his batteries in a pocket. When he only has one battery, he tapes a warmer to the camera body.
Your other small batteries matter too, because your headlamp or GPS unit usually runs on AA or AAA cells, and so do many trail cameras.
A Backpacking Light gear tester timed AAA cells in a Xenon flashlight at three temperatures, and the results make the choice easy.
Alkaline cells lasted 90 minutes at 70 °F, then 50 minutes at freezing and only 25 minutes at 0 °F. Rechargeable NiMH cells held 90 minutes down to freezing and dropped to 60 minutes at 0 °F.
Lithium primary cells ran 2 hours 40 minutes at both 70 °F and freezing, and still managed 2 hours 30 minutes at 0 °F, which means the cold barely touched them.
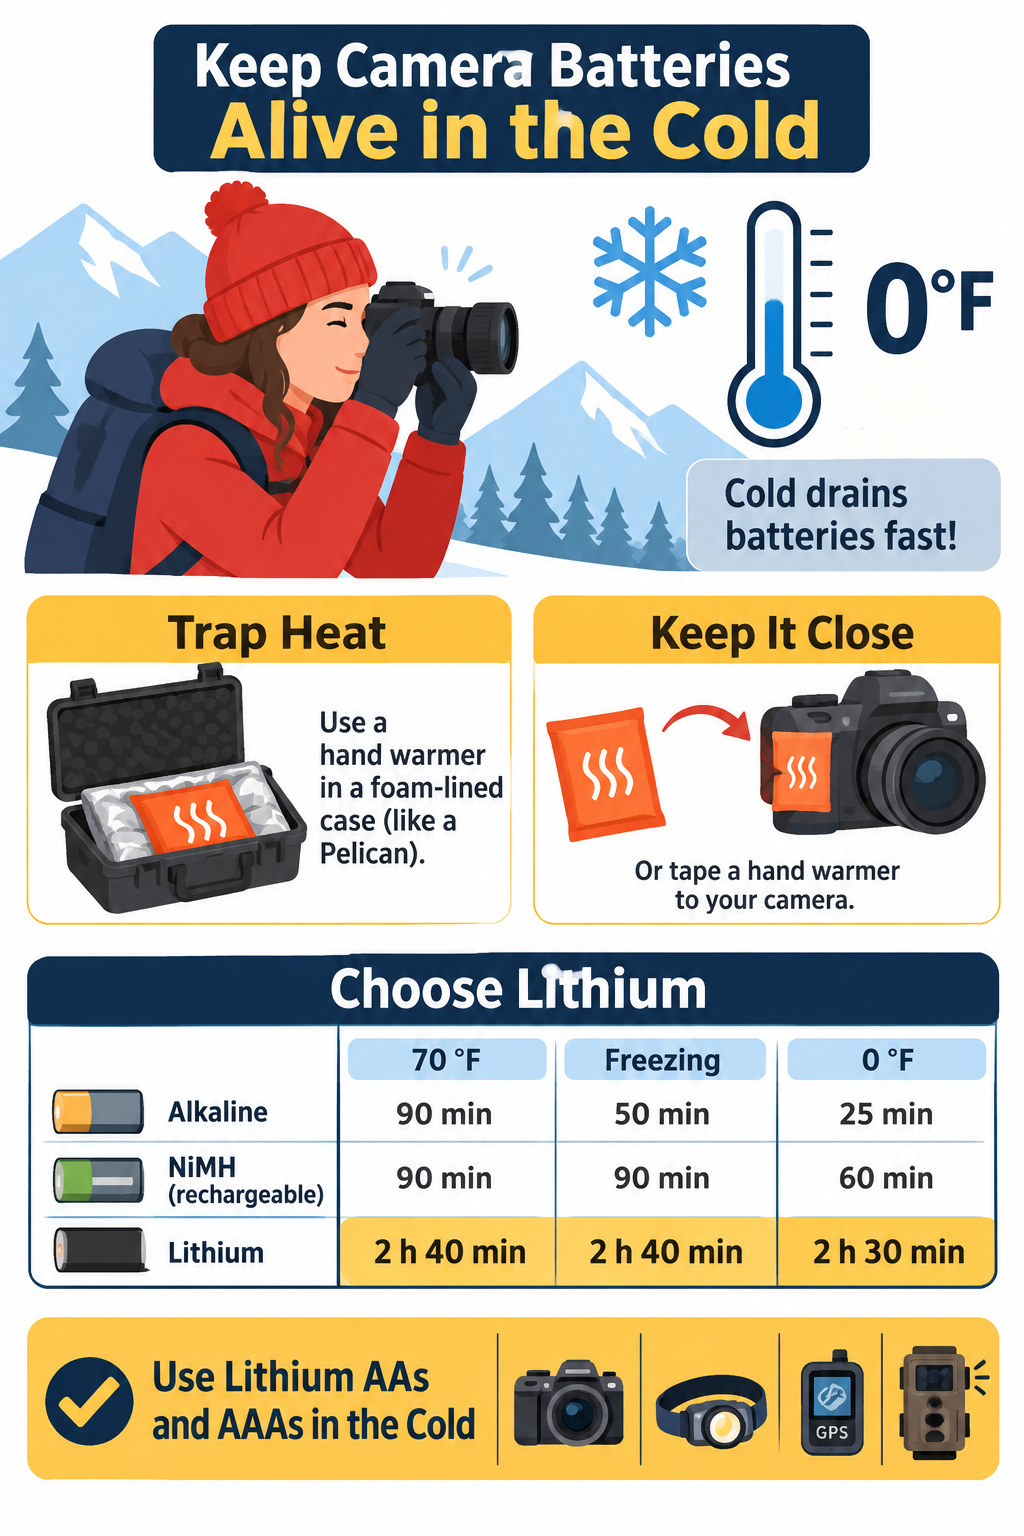
So for any cold trip, put lithium AAs and AAAs in everything that takes them and leave the alkalines at home, which brings us back to the meadow and that fox.
Putting the system together on the trail
With a warm battery waiting in your chest pocket, the swap takes ten seconds, and the “exhausted” battery goes against your skin, where it will be ready again before breakfast.
Before the trip, test your spares and set the camera up to waste as little power as possible. On the trail, swap early and keep every battery close to your body, including at night in your sleeping bag. If you’re hiking with others, see how to take better hiking photos without holding up the group for two camera presets you can set at the trailhead.
If you do that, the batteries you already own will last the whole hike, with some charge left over for the walk out.
References
- Luo, H., Wang, Y., Feng, Y.-H., Fan, X.-Y., Han, X., & Wang, P.-F. (2022). Lithium-Ion Batteries under Low-Temperature Environment: Challenges and Prospects. Materials (Basel), 15(22), 8166. https://doi.org/10.3390/ma15228166




1 thought on “How to keep camera batteries alive on a multi-day hike with no power”