A first-time spotting scope buyer walks into a shop, sees “60× magnification” on the box, and finds a price that looks like a bargain. It sounds like an easy choice.
Then comes the first morning in the field. At full zoom, distant birds look soft and fringed with purple. The view shakes in a light breeze. For someone wearing glasses, the eyepiece may show only part of the picture.
The buyer spent less, but didn’t necessarily get good value. The best spotting scope for the money is the one that delivers a clear, comfortable view for its intended use, with enough left in the budget for a steady tripod.
Finding that value starts with understanding which features make a visible difference—and which numbers on the box matter less than they seem.
What “Best for the Money” Actually Means
When someone asks about the best spotting scope for the money, they almost never want the cheapest option. They want the point where spending more stops buying noticeably better views.
That point depends heavily on how you’ll use the scope. A birder cares about close focus, color accuracy and weight, because they’re hiking miles and need to tell a Western Sandpiper from a Semipalmated at the edge of a mudflat.
A hunter cares about durability, compactness and how bright the image looks at dawn and dusk.
A target shooter wants a razor-sharp image at 20-40x so they can read bullet holes at 100 yards or more. A digiscoper, someone who shoots photos through the scope, wants clean optics and a body that works well with a phone adapter.
The short answer, the one I’d give a friend over coffee, is to choose clear optics, a comfortable eyepiece and a sturdy tripod for the way you’ll actually use the scope. The Vortex Viper HD 20-60×85 and the larger Celestron Regal M2 100ED illustrate different ways to spend that budget.
They deliver most of the image quality of scopes that cost two or three times as much.
That answer only makes sense once you know what each of those features does, so let’s break them down.
How Spotting Scope Optics Work
Objective Lens Size
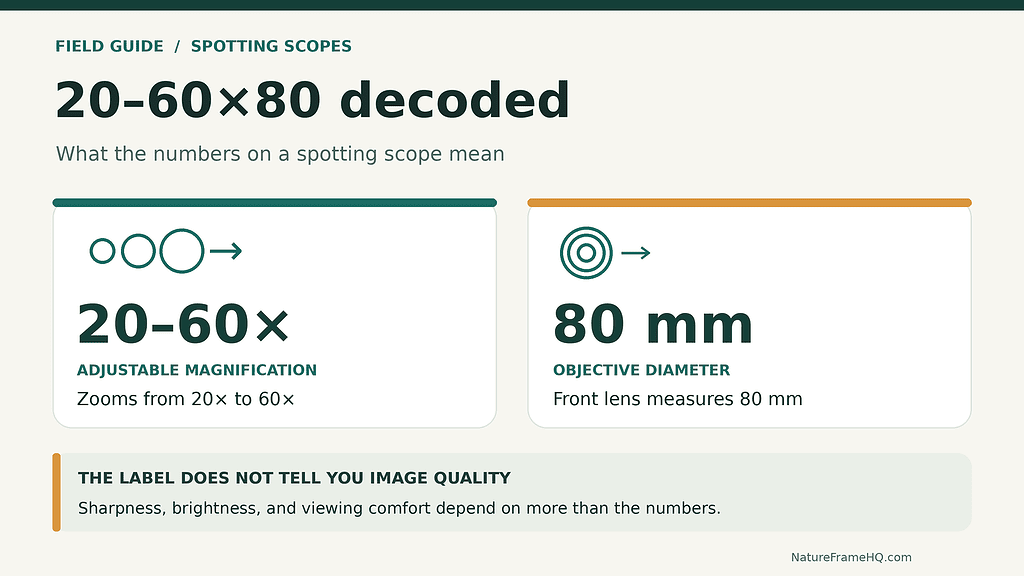
The objective is the big lens at the front, and its diameter controls how much light the scope gathers. More light means a brighter, more detailed image, especially at dawn, at dusk and under heavy cloud.
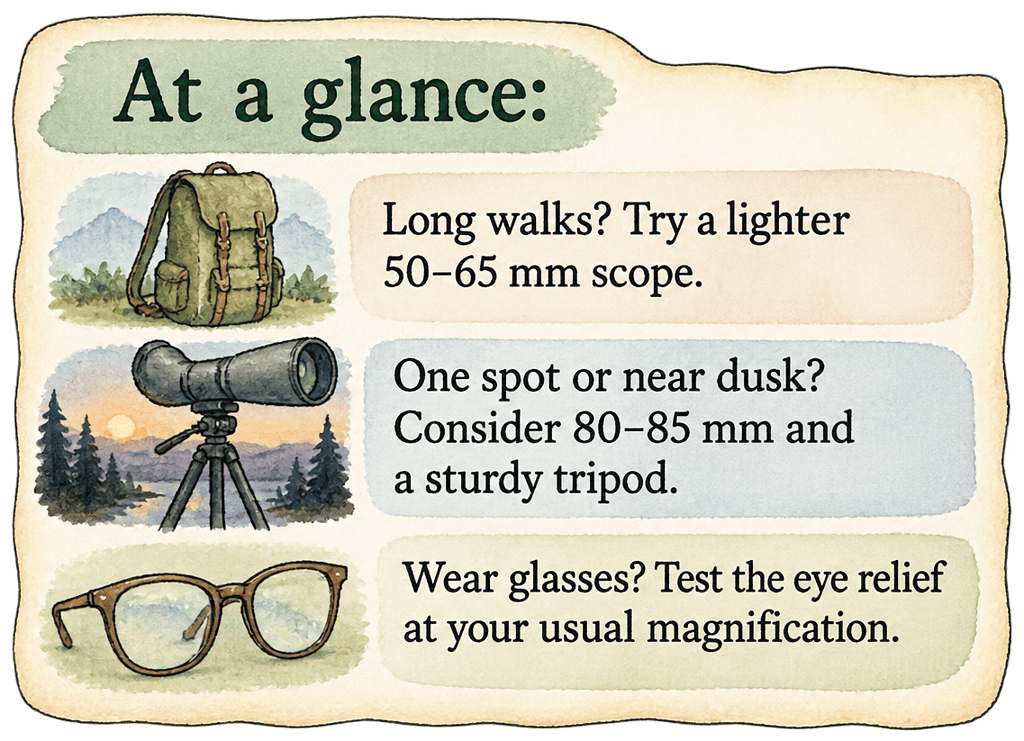
Scopes in the 50-65mm range are compact and light, which makes them great for travel and hiking, but they run out of steam in low light. The 80-85mm class is the value tier for most people.
It’s bright, it handles early and late light well, and it usually weighs around 3-4 pounds, which is easy enough to carry.
Once you jump to 90-100mm and beyond, you get gorgeous low-light views, but you also get extra weight, a need for a much sturdier tripod, and prices that climb steeply.
Pro Tip: If you’re torn between 65mm and 80mm, think about when you’ll actually be out. If it’s mostly midday and you’re carrying the scope a long way, 65mm is fine.
If you love the first and last hour of daylight, go bigger.
Magnification and Why Less Is More
Almost every zoom spotting scope advertises 20-60x. That sounds amazing, but experienced users spend most of their time between 20x and 40x. If the numbers on the box are still confusing, see my guide to what 20–60×80 means.
The reason comes down to physics. Past about 40x, you’re magnifying everything, including heat shimmer rising off the ground, haze in the air and every tiny vibration in your tripod.
A useful rule of thumb says the practical most magnification is about twice the objective diameter in millimeters, and in real-world conditions you’ll often get less.
An 80mm scope tops out around 160x in theory, but anything above 40-50x usually just gives you a bigger, softer, dimmer image on a typical day.
I think of high magnification like the top end of the volume dial on a cheap speaker. It’s technically there, but the distortion makes it not worth using.
A scope that stays crisp from 20x to 45x will beat a “60x” scope that goes mushy at the top every single time.
ED Glass and Chromatic Aberration
This is where a lot of the money question gets answered. ED stands for extra-low dispersion, and you’ll sometimes see it labeled HD. This special glass reduces chromatic aberration, which is the color fringing you see along high-contrast edges, like a dark bird against a bright sky or the edge of a black bullet hole on white paper.
Without ED glass, you get purple or green halos. They soften edge detail and sap contrast, especially when you push the magnification up.
With ED glass, edges are cleaner, colors are truer, and the whole image looks sharper even when the raw resolution is similar.
ED matters most on scopes of 80mm and up, and when you use higher magnification. On a small 50mm scope at 20x, you’d have a hard time telling the difference.
That’s why so many value-minded buyers treat ED glass as the single best upgrade in the mid-range. The Cornell Lab’s guide to choosing a spotting scope offers another useful explanation of glass quality and magnification.
It’s the feature that most clearly separates a good-enough scope from one you’ll love.
Coatings
Look for the phrase fully multi-coated. It means every air-to-glass surface in the optical path has several layers of anti-reflective coating, which boosts light transmission and cuts glare.
Be wary of vaguer wording. “Coated” or “multi-coated” on its own usually means only some surfaces are treated, which is typical of a budget scope.
Premium models go further, adding phase-correction coatings on the roof prisms to sharpen contrast and resolution, plus water-shedding outer coatings that resist rain and fingerprints.
Prism Type and Eyepiece Angle
Nearly all modern spotting scopes use roof prisms, which allow a slimmer, tougher body than the older Porro design. Better models add phase-correction coatings for extra snap.
For the eyepiece, you’ll choose between angled and straight. Angled eyepieces are easier on your neck, work well with a lower tripod, and make it simple to share the view with several people, which is why birders tend to favor them.
Straight eyepieces make it quicker to aim and are often preferred by hunters glassing from a vehicle window or over a pack.
Eye Relief: The Spec That Ruins More Purchases Than Any Other
If you wear glasses, listen up, because this is the thing nobody warned me about.
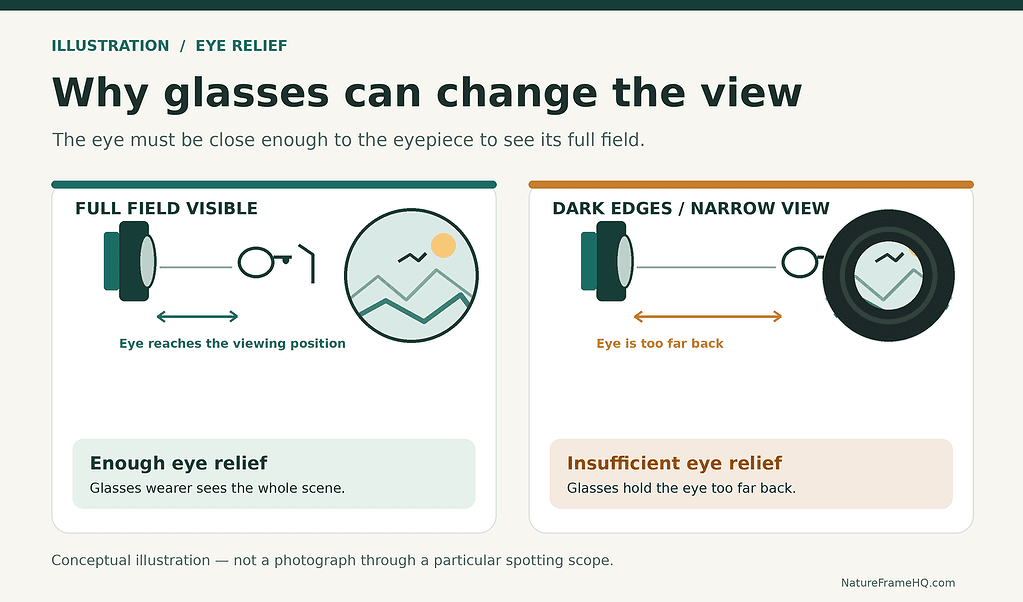
Eye relief is the distance between the eyepiece and your eye at which you can still see the full image. Glasses hold your eye farther from the lens, so a scope with short eye relief gives you the tunnel-vision view I described earlier.
If you wear glasses, you want at least 15mm, and ideally 17-20mm or more, at the magnification you actually use.
Here’s the catch most spec sheets bury. Eye relief usually shrinks as you zoom in, so a scope with generous eye relief at 20x might feel cramped at 40x.
Always check the number at both ends of the zoom range.
A few things help. Look for twist-up or fold-down eyecups so you can adjust to your face and glasses.
Consider a fixed-power wide-angle eyepiece, which often has more comfortable eye relief and a wider view than a zoom eyepiece.
Pay attention to the obvious field of view too, because a wide field makes the image more forgiving if your eye sits slightly back.
Key Insight: Many people don’t realize eye relief is the source of their discomfort until they use a scope outdoors with their glasses on. If you can, test one in a shop or buy from a retailer with a generous return policy.
Waterproofing, Fog-Proofing and Build Quality
Moisture kills a good view. You can own the sharpest glass in the world and it’s useless if the inside fogs up the moment you walk from a warm car into cold air.
What you want is O-ring sealed construction to keep rain and dust out, plus nitrogen or argon purging, which swaps the air inside the scope for dry gas so there’s nothing to condense when temperatures swing. Look for a clearly stated waterproof rating as opposed to fuzzy “water-resistant” language, and a rubber-armored body that cushions bumps and stays grippy when wet.
You can handle external fogging and rain yourself. A neoprene scope cover or stay-on case protects the body.
An extendable lens hood or dew shield keeps rain and stray light off the objective.
A microfiber cloth is cheap and lives in your pocket. In a downpour, turn the objective downwind if you can, so the rain isn’t blowing straight onto the glass.
Other Features That Quietly Matter
Close-focus distance is a big one for birders. If you can focus down to around 10-15 feet, you’ll catch the warbler that lands in the bush right in front of you.
Some scopes can’t focus closer than 20-30 feet, which is incredibly annoying when something interesting shows up nearby.
The focus mechanism matters too. Dual-focus systems with a coarse and a fine control let you snap to roughly the right spot and then dial in precisely, which makes a real difference when you’re tracking a moving subject.
Then there’s the support system, which I treat as seriously as the scope itself.
The Tripod Is Half the Scope
A great scope on a wobbly tripod gives you a wobbly view. I’d go so far as to say a solid tripod improves your experience more than a $300 optical upgrade does.
Budget somewhere from $100 to $300 or more for a sturdy tripod with a smooth fluid or pan-tilt head. Carbon fiber is lighter and damps vibration well, while aluminum is cheaper and perfectly serviceable.
Whichever you pick, make sure it’s rated for comfortably more weight than your scope, and extend the thick leg sections before the thin ones for most stability. For a broader look at tripods and other field essentials, see my guide to building an outdoor photography kit.
Real-World Picks by Budget
Prices and specs shift all the time, so confirm current details before you buy. Think of these as examples of what each tier looks like.
Scopes Compared
| Model and size | Tier | Optics | Weight | Eye relief |
|---|---|---|---|---|
| Celestron Ultima 20–60×80 angled | Budget | Fully multi-coated; non-ED | 57 oz | 18 mm |
| Vortex Viper HD 20–60×85 straight | Mid-range | HD optical system | 76.4 oz | 17.8–19.6 mm |
| Celestron Regal M2 22–67×100 angled | Mid-range | ED objective; XLT coatings | 85.3 oz with eyepiece | 20 mm at 22× |
| Athlon Ares G2 UHD 20–60×85 angled | Mid-range | UHD / ED glass | 70 oz | 19.5–18 mm |
Specifications checked against manufacturer listings for the variants shown; weights exclude a tripod. Add roughly $100–$300 to your budget for steady support, as discussed below. Prices and availability can change, so check the linked model before buying.
Budget (Roughly $150-$500)
The Celestron Ultima 80 and similar 65-80mm scopes give you fully multi-coated optics, a simple design and usually a waterproof body. The tradeoff is non-ED glass, so expect some color fringing at high power.
For backyard birders, first-time buyers and occasional range sessions, they’re a sensible start.
Mid-Range Value (Roughly $500-$1,200)
This is the tier I’d steer most people toward. The Vortex Viper HD 20-60×85 offers HD glass, rugged waterproof and fogproof construction, and Vortex’s unlimited lifetime warranty, which adds real value.
The Celestron Regal M2 100ED pairs ED glass with a larger 100mm objective and 22-67x eyepiece. At 85.3 ounces with its eyepiece, it is better suited to viewing from one spot than to a long hike. The Athlon Ares G2 is another ED-class contender.
Premium ($1,500-$4,000+)
Kowa’s TSN series, Swarovski’s ATS and STS lines, the Zeiss Harpia and the Leica APO-Televid are the aspirational names. You get superb edge-to-edge sharpness, outstanding low-light performance, beautiful ergonomics and excellent wide-angle eyepieces.
These are for guides, daily birders and optics lovers who will notice and appreciate every extra bit of performance.
How to Choose Your Scope Step by Step
Start by writing down your main use, and be honest. If you’ll be watching birds 90 percent of the time, your priorities are close focus, weight and color accuracy.
If it’s range shooting, prioritize sharpness at 20-40x and a straight eyepiece.
Next, set a total budget that includes the tripod. A common mistake is spending everything on the scope and then mounting it on a $40 tripod.
A sensible split is around 70-75 percent for the scope and 25-30 percent for support and accessories.
Then pick your tier. If your total budget is under about $500, go with a good non-ED 65-80mm scope and invest in the tripod.
If you can reach $700-$1,200, jump to an 80-85mm ED model, because that’s where the value curve is steepest.
After that, check eye relief at your working magnification if you wear glasses, and verify the close-focus distance if you’ll view nearby subjects. Confirm fully multi-coated optics and a nitrogen- or argon-purged waterproof body.
Finally, buy from somewhere with a good return policy, test the scope outdoors in real light, and judge it at 20-40x as opposed to at most zoom. If you can compare models in person first, Audubon’s spotting scope buying guide explains what to look for when you try them. If the edges look clean and the view feels comfortable after twenty minutes, you’ve got a winner.
Common Mistakes and How to Avoid Them
The biggest trap is chasing magnification. A big number on the box is marketing.
Judge a scope by how it looks at 30x, not by how it claims to look at 60x.
The second is skipping the tripod budget. I see this constantly, and it’s the fastest way to make a good scope feel bad.
Third is ignoring eye relief until after the purchase. Check it first, especially if you wear glasses.
Fourth is assuming “multi-coated” and “fully multi-coated” mean the same thing. They don’t, and the difference shows up as glare and lost brightness.
Fifth is buying a scope that’s too heavy for how you travel. A big 95mm scope is wonderful until you’re hauling it up a ridge.
If you won’t carry it, you won’t use it.
Matching Your Choice to Your Situation
For birding, lean toward an angled eyepiece, a 65-85mm objective, close focus under 15 feet and a lighter body. For hunting, a straight eyepiece, compact size, rugged armor and strong low-light performance rise to the top.
For target shooting, prioritize sharp, stable 20-40x optics and pick a straight or angled eyepiece depending on your shooting position. For digiscoping, ED glass and a stable tripod are essential, and a close-focus scope plus a well-fitting phone adapter will get you the best results.
If you travel a lot, a 50-65mm scope in a compact body might be the smartest compromise, even if it gives up a little low-light brightness. My guide to lightweight hiking photography gear can help you decide what else is worth carrying. If you often share the view with friends or kids, an angled eyepiece and a tripod that adjusts quickly make a huge difference.
Building On the Basics
If you’ve already used binoculars, a spotting scope is the natural next step. Many people carry 8×42 binoculars to find a subject quickly and then switch to the scope to study it.
Understanding exit pupil, which is the objective diameter divided by magnification, helps you forecast low-light performance. A bigger exit pupil means a brighter image, which is why a scope at 20x looks far brighter than the same scope at 60x.
Field of view works the same way.
It narrows as you zoom in, which is another reason to find your subject at low power and only then step up.
From here, it’s all about refining your setup. You might add a fixed wide-angle eyepiece, a better fluid head or a phone adapter, or eventually step up to a premium scope once you know exactly what you value.
Quality optics tend to hold their resale value well, so moving up later costs less than people expect.
Exercises to Reinforce What You’ve Learned
First, run a magnification test. Set up your scope on a sturdy tripod and view the same distant object at 20x, 30x, 40x and 60x.
Notice where the image starts to lose sharpness, brightness or stability, and make a note of your personal sweet spot.
Second, check for chromatic aberration. Find a high-contrast target, like a dark branch against a bright sky or a black-and-white sign, and look for colored fringes along the edges.
This trains your eye to see what ED glass fixes.
Third, if you wear glasses, test your eye relief at both low and high zoom. Notice the magnification where black edges start to creep in, then compare the view with and without your glasses.
Fourth, try a stability test. Look at a distant sign while gently tapping a tripod leg, and time how long the shake takes to settle.
A good tripod settles in a second or two.
Fifth, practice a weather routine. Attach a cover and lens hood, then see how quickly you can set up and pack away in simulated rain. The faster and more comfortable you are with your gear, the more likely you are to use it.
Frequently Asked Questions
What is the best spotting scope for the money?
A mid-range 80-85mm scope with well-corrected optics can be a good value when its weight and eye relief suit your use. For longer viewing from one spot, a larger model such as the Celestron Regal M2 100ED may be worth comparing with the Vortex Viper HD 20-60×85.
How much should I spend on a spotting scope?
Most people get great results spending $500-$1,200 on the scope and another $100-$300 on a tripod. If your budget is under $500, a non-ED scope paired with a solid tripod is a smart plan.
What size spotting scope do I need for birding?
A 65-85mm objective suits most birders. Go with 65mm if you carry the scope long distances in daylight, and choose 80-85mm if you often bird at dawn and dusk.
Is a spotting scope better than binoculars?
A spotting scope gives you far more magnification, so it’s better for studying distant birds, animals or targets. Binoculars are better for finding subjects quickly and for scanning wide areas, which is why many people carry both.
What does ED glass mean on a spotting scope?
ED stands for extra-low dispersion. This glass reduces color fringing around high-contrast edges, which gives you a sharper, cleaner and more natural-looking image.
What magnification is best for a spotting scope?
Most people get their best views between 20x and 40x. Higher settings magnify heat shimmer, haze and tripod vibration, so the image often gets softer and dimmer.
Can you use a spotting scope with glasses?
Yes, as long as the scope has enough eye relief. Look for at least 15mm, and ideally 17-20mm or more, measured at the magnification you actually use.
Is a 20-60x spotting scope good?
A 20-60x zoom is the standard range and works well, provided the optics hold up at the high end. Treat 40x as your everyday most and 60x as an occasional bonus in perfect conditions.
What is the best spotting scope for target shooting?
Look for sharp, stable optics at 20-40x, ideally with ED glass for clean bullet-hole edges. A straight eyepiece is popular on the range because it makes aiming quicker.
Do I need a special tripod for a spotting scope?
Yes, a sturdy tripod with a smooth fluid or pan-tilt head makes a huge difference. Choose one rated for more weight than your scope, and carbon fiber is a great choice if you want less weight and less vibration.
What is the difference between an angled and a straight spotting scope?
An angled eyepiece is easier on your neck and great for sharing views, which is why birders like it. A straight eyepiece is quicker to aim and works well for hunting and shooting.
Key Takeaways
The best spotting scope for the money is usually a mid-range 80-85mm ED or HD scope with fully multi-coated optics and a sealed, nitrogen-purged waterproof body. Most useful viewing happens at 20-40x, so don’t be seduced by 60x claims.
Glasses wearers need eye relief of at least 15mm, ideally 17-20mm or more, checked at their working magnification.
A solid tripod and fluid head can improve your views more than an expensive optical upgrade, so budget for one from the start.