What the label tells you
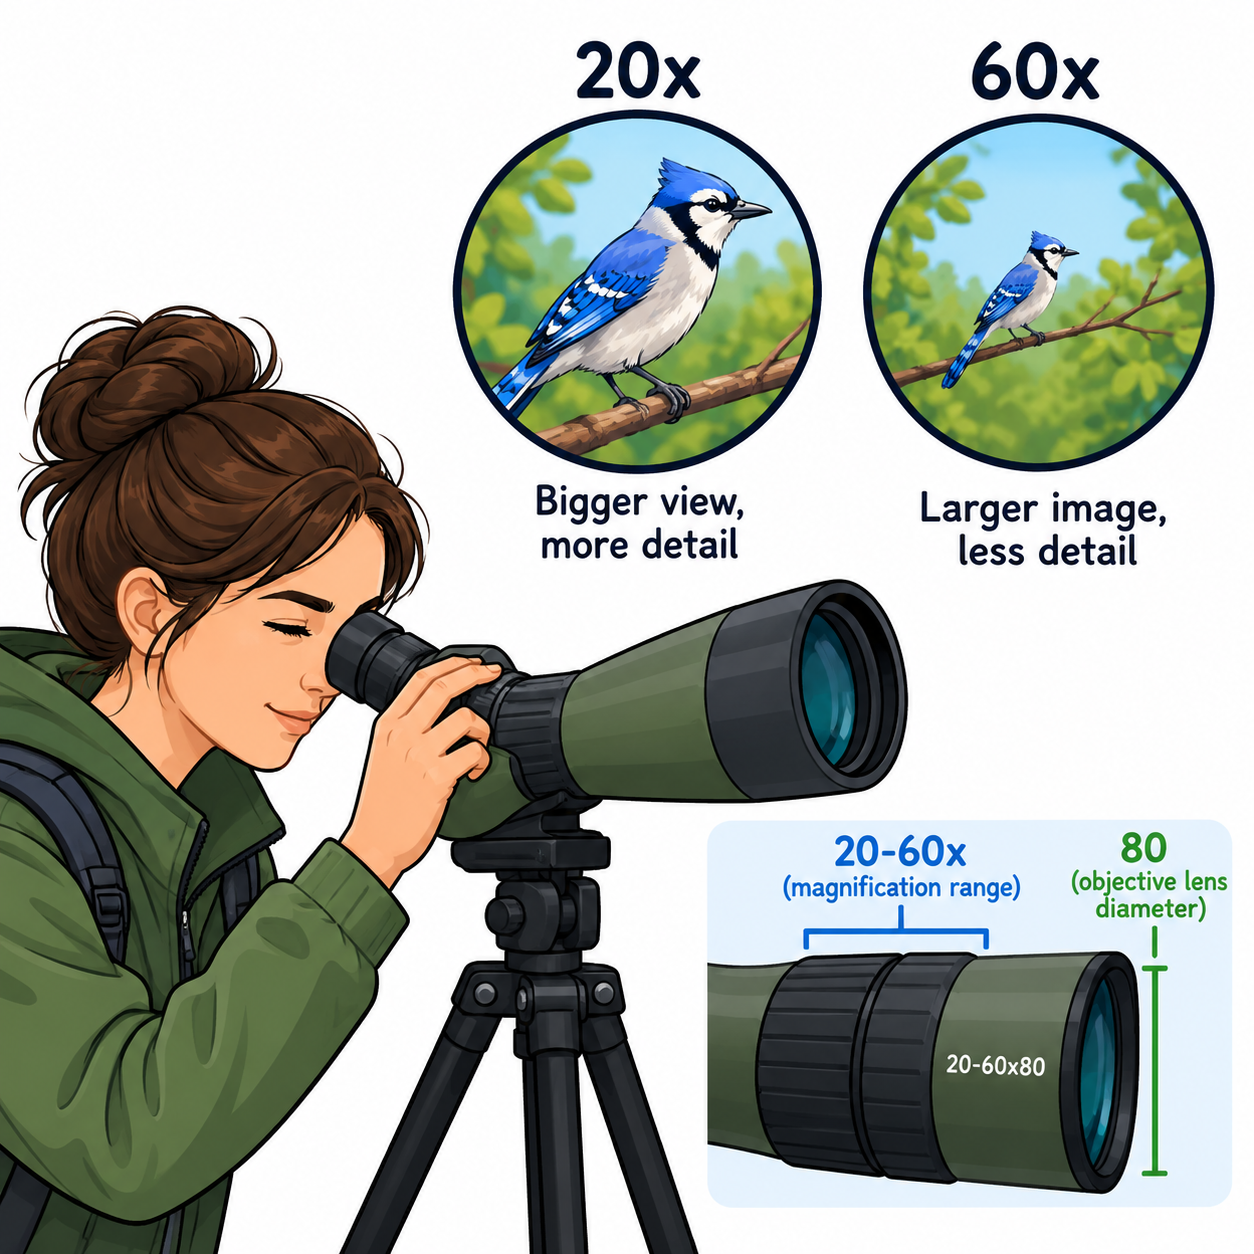
A bird can look larger at 60x while its markings become harder to see. If you are buying your first spotting scope, that is a good reason to look beyond the biggest number on the box.
A 20-60×80 spotting scope gives you an adjustable view from 20 times to 60 times magnification, through a front lens that measures 80 millimetres across. How much of that power you can use depends on the air between you and the animal, as well as how steadily you can hold the scope.
If you are wondering what the numbers on a scope mean, read the label in two pieces. The 20-60x tells you how much the scope can enlarge the view, while the 80 describes the diameter of the objective lens, which is the large lens facing the animal.
Turning the zoom ring changes the magnification while that front lens stays the same size. As you turn it, you change how much of the scene you can see and the size of the beam of light reaching your eye.
The label gives you no quality rating or guaranteed viewing distance. Two scopes with these same numbers can show quite different amounts of useful detail, especially near the top of their zoom range.
I would start your buying decision with the wildlife you hope to watch and how you will reach it. That gives you a way to judge how much magnification you will actually use.
What magnification do I actually need?
For general wildlife viewing, 20x to 30x is a sensible place to begin. That range works well for a fixed-power birding eyepiece and makes a useful starting point on a zoom scope.
At that power, you can study a resting duck or watch the behaviour of a distant mammal while keeping some of its surroundings in view. You also have a better chance of finding it again when it moves.
Start by finding the animal at the lowest setting and centring it carefully. Then turn up the zoom while watching whether extra detail appears.
If you begin at 60x, you may spend your time searching a narrow patch of reeds while the bird sits just outside the view. Starting low gives you room to match what you saw with your eyes or binoculars to what you see through the scope.
Your need for power also depends on the question you are trying to answer. Watching a deer feed makes different demands from checking a small feature on a distant bird, so a single magnification recommendation has limits. If you are looking for places to watch raptors, a local birding group can help you find them.
Higher power earns its place when the animal is still and you need to inspect a fine feature. In clear air, with a sharp scope on firm support, the upper end of the zoom can be useful.
I would keep 60x available as an option and let the view decide when to use it. If the animal looks larger while its markings become harder to read, check what happens when you turn the power down.
Why turning up to 60x can hide useful detail
Increasing magnification usually narrows the field of view, which is the width of the scene you can see through the scope. A bird takes up more space in that smaller window, so following it calls for more careful movement of the tripod head.
That makes high power demanding when wildlife keeps moving. A walking wader can leave the view while you adjust focus, and finding it again may mean turning the zoom back down.
The 80 mm objective tells you nothing definite about that width. Field of view depends on the optical design, including the eyepiece, so compare the stated field at matching magnifications when you compare scopes.
The air between you and the animal affects detail too. Air at different temperatures bends light unevenly, creating the wavering view often called heat shimmer, which can be strong over sunlit ground.
More magnification makes that moving distortion easier to see. If a bird’s outline seems to ripple, turning the zoom ring farther may enlarge the ripple without helping you read the feather pattern.
Vibration adds a separate limit because magnification also enlarges the apparent movement of the view. A light breeze or your hand on the focus control can make a distant subject shake enough to hide a small identifying mark.
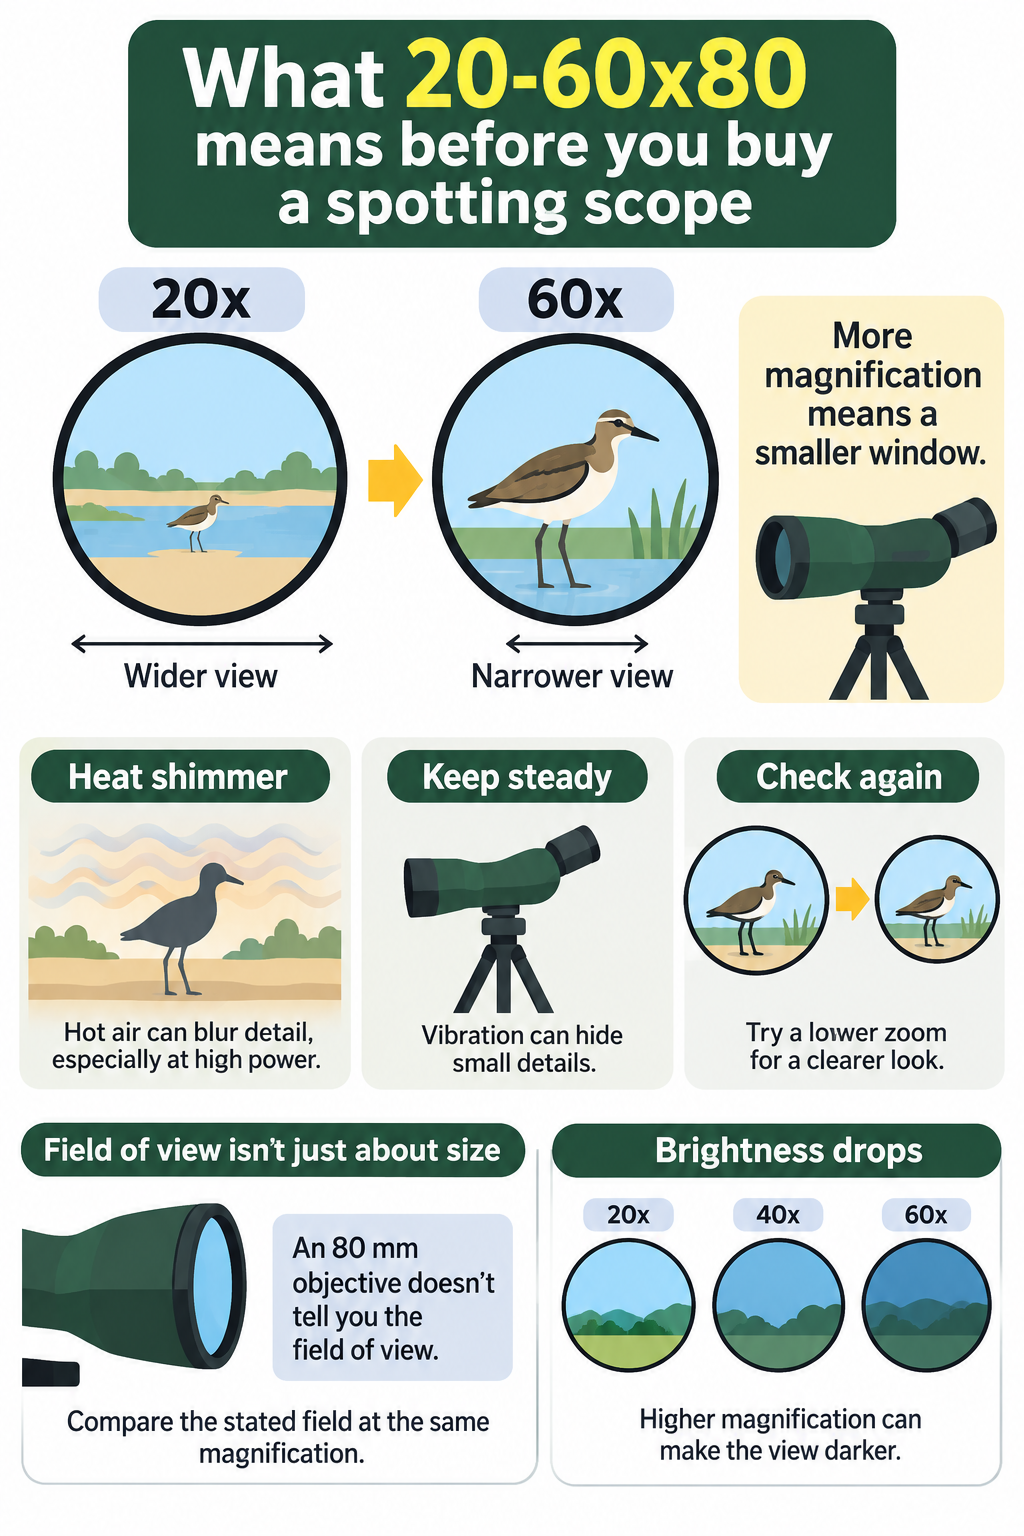
After focusing, take your hand away and let the image settle before judging it. Then ease the zoom down and check the same feature again, because a smaller, calmer image can be easier to read.
You can test these effects in daylight, but the change in brightness as you zoom becomes more obvious as the light fades. That is where the front lens size starts to make more practical sense.
What the 80 mm lens gives you as you zoom
An 80 mm objective gathers more light than a 65 mm objective under the same conditions. A larger effective lens diameter also offers greater potential to resolve fine detail.
That potential depends on the quality of the optics and the conditions around you. To understand how lens size works with magnification, it helps to know one more term, exit pupil.
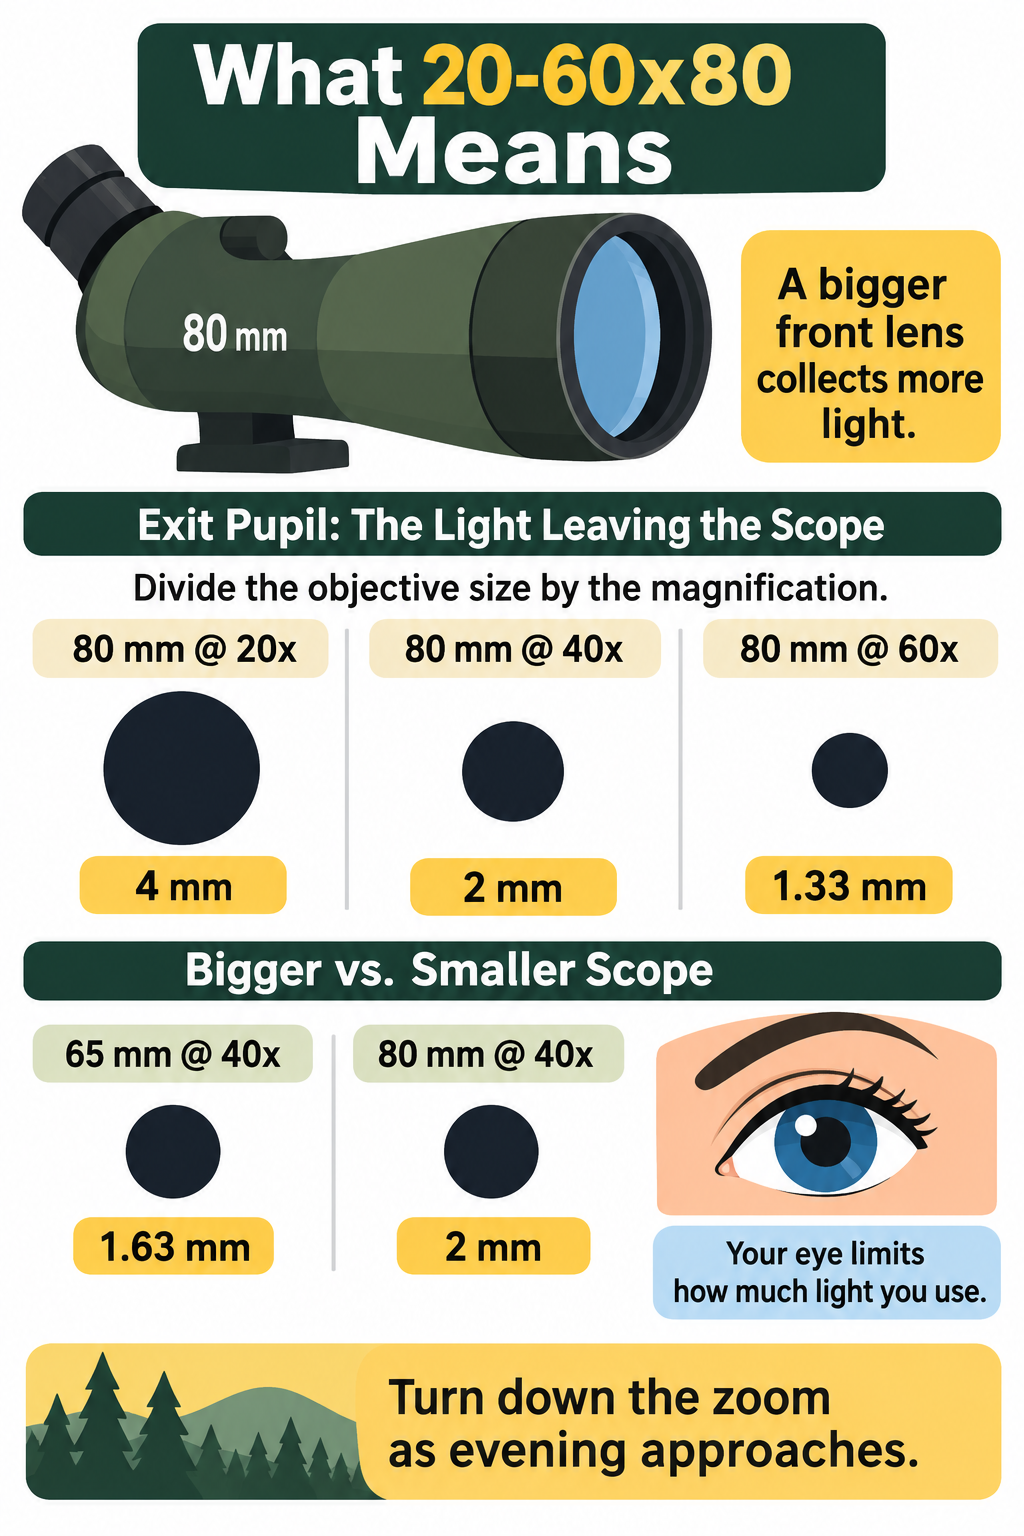
The exit pupil is the small disc of light leaving the eyepiece for your eye. As Nikon explains for optical equipment, you calculate its diameter by dividing the objective diameter by the magnification.
For an 80 mm scope at 20x, the calculation is 80 divided by 20, giving a 4 mm exit pupil. At 40x, the same scope gives you 2 mm.
Turn it up to 60x and the exit pupil falls to about 1.33 mm. The front lens has stayed exactly the same size throughout, yet the beam leaving the eyepiece has become much smaller.
This helps explain why the view can grow dimmer as you zoom, particularly in poor light when your own pupils are wider. Your eye also sets a limit on how much of the scope’s exit pupil it can use, so brightness depends on both.
At 40x, a 65 mm scope gives an exit pupil of about 1.63 mm, while an 80 mm scope gives 2 mm. That favours the larger scope for brightness when other factors are similar and your eye can accept the extra light.
Yet the 65 mm scope at 20x produces a 3.25 mm exit pupil, larger than the 80 mm scope produces at 40x. Even with a larger objective, turning the zoom down can help as evening approaches.
Exit pupil helps explain what you see, although glass quality and coatings also affect the view. For a fair comparison, set both scopes to the same magnification and judge the same subject.
An 80 mm scope can therefore be a good choice for watching wildlife near dusk, especially from one spot. Before choosing it, though, work out how much weight you will carry to get there.
The whole setup has to come with you
The weight printed beside the scope body is only part of what you carry. Add the tripod and head, then include any case or mounting parts that will stay with the setup during your walk.
There is no fixed weight attached to an objective diameter because designs differ. A 12-40×60 Leupold, for example, weighs 37 ounces, about 1.05 kg, while some larger 80 mm to 85 mm models weigh about 4 pounds, or 1.8 kg.
Those are model examples, so check the actual specifications of anything on your shortlist. Even within one objective size, differences in body construction and eyepiece design can change the load.
I would give carrying comfort real weight in the decision if your wildlife watching involves long walks. A smaller scope that fits easily into your day gives you more chances to stop and look, especially when you already carry binoculars. The same trade-off applies when deciding what photography gear to carry on a hike.
Viewing from a hide or a roadside viewpoint changes the balance. With a short carry and somewhere to settle, the extra bulk of an 80 mm scope may feel quite reasonable for the view it offers.
The tripod deserves the same care as the scope because it helps determine how much detail reaches your eye. Its stated load capacity is useful information, but steadiness also depends on its height and how well the head holds the scope in place. Our outdoor photography gear guide covers the rest of a practical field kit.
Test it at the height you will use outdoors, with the centre column positioned as you expect to use it. A tripod that feels firm when low can behave differently once extended, especially in wind.
Comfort counts here too, because crouching over an eyepiece soon cuts a viewing session short. Once the complete setup feels steady and comfortable, you can make a much fairer judgment about the glass itself.
Why identical numbers can give different views
Two 20-60×80 scopes can have matching headline specifications and very different prices, and part of that gap may be visible through the eyepiece. The label leaves out how well each scope handles the light passing through it.
Lens coatings help light pass through the optical surfaces and control unwanted reflections. Good control of stray light matters when you are trying to see a dark bird against bright water, because washed-out contrast can hide its markings.
Extra-low-dispersion glass, often labelled ED, helps reduce colour fringing. This happens because different colours of light can focus at slightly different points, leaving coloured edges around a high-contrast subject.
You may notice it along a bird’s dark bill against pale sky. When those edges stay cleaner, it can be easier to judge the shape you are trying to identify.
Glass labels and coating claims still leave you with a viewing test to do. The whole optical design and its build quality affect the result, so I would give more weight to a clear view of a difficult subject than to a long list of terms on the box.
Compare fine detail in the centre first, then move the subject towards the edge and see how the view changes. Also check how easily you can reach a confident focus, since a fussy focus control can become tiring during a long watch.
If you wear glasses, try the scope with them on and adjust the eyecup as needed. You should be able to see the intended field comfortably without holding your head in one awkward position.
These differences are easiest to judge when you have two complete setups beside each other. A short, repeatable test gives you a firmer basis for comparison than your memory of a view from several days earlier.
Try the view you expect to use
Before buying, look for a chance to compare scopes in person at a nature centre or a specialist shop with an outdoor view. A birding event can also give you a chance to ask about the support beneath a scope you enjoy using.
Choose a subject with fine detail, such as a resting bird or the rough bark of a distant tree. Keep the distance and light as similar as you can while comparing models.
Begin at the lowest power and find the subject without help. Notice how easy it is to centre, then increase magnification gradually and refocus whenever needed.
At each setting, ask yourself what extra feature you can now see. If the view grows larger while the useful detail stays the same, try a lower setting and check again after taking your hand off the scope.
Use the tripod at a comfortable height throughout the test. If the image shakes after a focus adjustment, notice how long you have to wait before you can read fine detail again.
Finally, pick up the complete packed setup and think about your actual walk. For mobile daylight viewing, a compact scope with a useful lower zoom range deserves serious consideration, while long sessions from one place can make a larger objective worth its extra weight.
I would spend for a clear view at the powers you expect to use, with enough budget left for steady support. When a scope feels comfortable to carry and easy to settle behind, you can spend more of your time watching the wildlife you bought it to see.